 [tta_listen_btn]
 April 11 2025

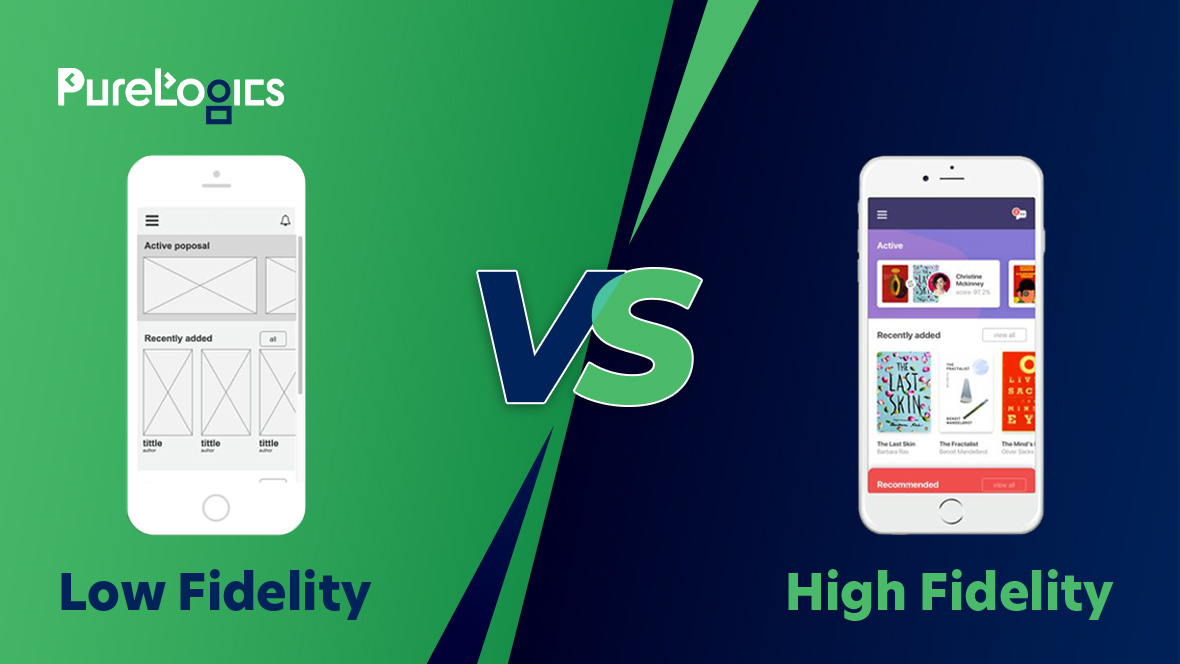
In design, the word ‘fidelity’ is used to describe how detailed or functional a design is.
Low fidelity prototypes are basic and focus on ideas and structure, while High fidelity prototypes are refined and resemble the final product. Each type serves a unique purpose in the design process, helping teams test, improve, and finalize their work effectively.
In today’s blog post, you’ll get answers to these prototyping-related questions:
- What is prototyping all about?
- Why is prototyping essential in the design process?
- Understanding Low fidelity and High fidelity prototypes and when to use them
- Advantages and disadvantages of using Low fidelity and High fidelity prototypes
- Key differences between Low fidelity and High fidelity prototypes
- Moving from low to High fidelity
What is Prototyping?
Prototyping is the hands-on stage of a project, during which a team turns their written ideas into a real, testable version of the product. This process allows developers to explore the product’s performance and address any issues early.
By working on different levels of prototypes, teams can make steady progress toward creating a product that meets user needs. It’s an essential part of the design journey that ensures the final version is the best it can be.
Why is Prototyping Essential in the Design Process?
Prototyping is super important because it helps turn ideas into something real and testable. For example, if you’re creating a food delivery app, starting with a Low fidelity prototype—like a simple sketch or wireframe—lets you plan the app’s layout and features. You can easily make changes if something doesn’t feel right.
As you move to a High fidelity prototype, you can test a more polished version with visuals and clickable buttons. Let’s say users can’t find the checkout button during testing—that’s something you can fix before launching the app. Prototyping helps you spot problems early, making the design process smoother and ensuring the final product works well for users.
Understanding Low fidelity Prototypes
Low fidelity prototypes are simple, rough sketches or wireframes that focus on structure and functionality rather than visuals. These prototypes are quick to create and help in brainstorming ideas without diving into too many details.
For example, if you’re designing a travel booking website, a Low fidelity prototype might be a paper sketch showing how users can search for flights, view options, and navigate to checkout. It’s not about colors or fonts—it’s about getting the basic layout and flow right.
You should use a Low fidelity prototype when:
- You need to map out basic ideas and concepts without spending too much time.
- You want to discuss ideas with your team to align on the app’s structure or navigation flow.
- You want early feedback from stakeholders or users on the design direction.
Advantages and Disadvantages of Using Low fidelity Prototype
The following are the benefits of employing a Low fidelity prototype:
(a) Simplifies Evaluation of Product Ideas
Low fidelity prototypes simplify the process of testing and refining product ideas. By focusing on the core structure and flow, they allow teams to quickly assess different concepts without getting caught up in design details.
(b) Accessible for All Team Members to Create
These prototypes are simple enough for anyone to create, not just designers. Whether you’re a developer, product manager, or even a stakeholder, you can contribute ideas and quickly create a basic prototype.
(c) Flexible and Easy to Modify
Since Low fidelity prototypes are quick to make, adjusting them based on feedback or new ideas is straightforward. You can revise and test concepts rapidly without investing significant time or resources.
Now also let’s have a quick look at the disadvantages of using Low fidelity prototypes:
(a) Not Ideal for Comprehensive Usability Testing
Low fidelity prototypes are too basic to test detailed user interactions. They lack the refined elements needed to accurately evaluate how users will engage with the product.
(b) Doesn’t Capture the Full Interaction Experience
These prototypes fail to show how the product will react during real-time use. Since they lack animations or interactive elements, it’s difficult for users to get a true sense of how the final product will behave.
Understanding High fidelity Prototypes
High fidelity prototypes are more detailed and realistic versions of the design, often interactive, and visually similar to the final product. These prototypes include colors, images, typography, and clickable elements.
For example, if you’re designing a clothing app, a High fidelity prototype would let users click on items, view details, add them to a cart, and even simulate checkout. This gives a near-final experience to understand user behavior.
You should use a High fidelity prototype when:
- You want users to interact with the design and provide feedback on functionality.
- You need to align developers and ensure they understand how the final product should look and function.
- You need to showcase a polished, professional-looking design.
Advantages and Disadvantages of Using High fidelity Prototypes
The following are the advantages of employing a High fidelity prototype:
(a) Realistic Representation of the Final Design
High fidelity prototypes offer a near-complete visualization of how the final product will look and feel. This gives teams and stakeholders a clear understanding of the final design, ensuring alignment in style and functionality early on.
(b) Testing Interactive Features and Animations
One of the major advantages is the ability to test detailed interactive elements like animated transitions, hover effects, and smooth page shifts. These elements are crucial for a polished user experience and can be assessed before development begins.
(c) Effective for User Testing and Feedback
With their polished, interactive nature, High fidelity prototypes allow for comprehensive usability testing. Users can engage with the prototype as they would with the finished product, offering more insightful feedback about its usability.
Now also let’s have a quick look at the disadvantages of using High fidelity prototypes:
(a) Time and Effort-Intensive Development
Creating High fidelity prototypes takes considerable time and effort. The level of detail required means each update or modification can be slow and labor-intensive, potentially delaying the overall project timeline.
(b) Requires Expertise and Advanced Tools
Building a High fidelity prototype often demands advanced design skills and specialized tools. This can make the process more complex, requiring skilled designers and potentially increasing costs for the project.
Key Differences Between Low fidelity and High fidelity Prototypes
| Aspect | Low fidelity Prototypes | High fidelity Prototypes |
| Detail Level | Simple and rough, focusing on basic structure and functionality | Highly detailed, resembling the final product in visuals and interactions |
| Purpose | Used to brainstorm ideas and test concepts early in the design process | Used to test functionality and user experience closer to final implementation |
| Creation Time | Quick and easy to create with minimal effort and resources | Time-consuming due to the level of detail and interactivity required |
| Tools Used | Often created using paper, whiteboards, or basic tools like Balsamiq | Built using advanced design tools like Figma, Sketch, or Adobe XD |
| User Testing | Limited to feedback on structure and navigation flow | Allows for detailed usability testing, including user interaction and animations |
| Team Accessibility | Easy for all team members, even non-designers, to contribute and modify | Requires specialized design skills and technical expertise to build and modify |
| Visuals | Basic sketches or wireframes with no focus on colors or branding | Includes detailed visuals, branding, typography, and imagery |
| Interactivity | Limited or no interactivity; users cannot fully engage with the prototype | Fully interactive, allowing users to click, navigate, and simulate real use |
| Cost | Low cost, as it requires fewer resources and no specialized tools | Higher cost due to advanced tools and skilled professionals involved |
| Use Case | Suitable for early-stage concept exploration and team brainstorming | Ideal for final-stage user testing, client presentations, and development alignment |
Moving from Low to High Fidelity
Making the wrong choice between low and high fidelity is a common pitfall in product design. Starting with High fidelity prototypes too early often wastes time and effort. Low fidelity prototypes allow teams to clarify ideas first, while High fidelity designs refine the details. Remember, blending both is sometimes the best approach.
Ready to refine your product design? Connect with our creative professionals. We offer a free 30-minute consultation call to guide you.